Companion guide · SaaS Configurator

For agency owners building their first sellable plan

Getting started with the GoHighLevel SaaS Configurator.

Use this beside your HighLevel account. It follows the first-plan setup in the order you see it: architecture, billing, category, plan, usage, checkout and launch testing.

Build: one Standard plan with a tested snapshot.
Decide first: SaaS V1 or SaaS V2—the billing systems are different.
Do not publish: until a controlled checkout has provisioned correctly.
Before you start

Write the promise before you create the product.

Use one sentence: “Standard is $___ per month, includes ___, provisions ___, and charges or blocks ___ at overage.” Keep that sentence open while you configure the screens below.

Offer
Price, billing interval and included usage
Provisioning
Snapshot, features and user access
Lifecycle
Trial, upgrade, cancellation and support owner

01 · ARCHITECTURE

Choose SaaS V1 or SaaS V2 before building a plan.

  • V1: Stripe is the system of record. Use it when the Stripe-based workflow is intentional.
  • V2: a selected internal Agency Sub-Account and its supported payment provider are the system of record.
  • Important: V2 does not support proration for tier or billing-interval changes.
What you should see: SaaS Configurator is available in Agency View. Its plan flow asks you to select the applicable payment processor or billing architecture before the plan screens.
02 · BILLING FOUNDATION

Connect the billing system for the architecture you chose.

  • For V1: Agency View → Settings → Stripe → Connect with Stripe.
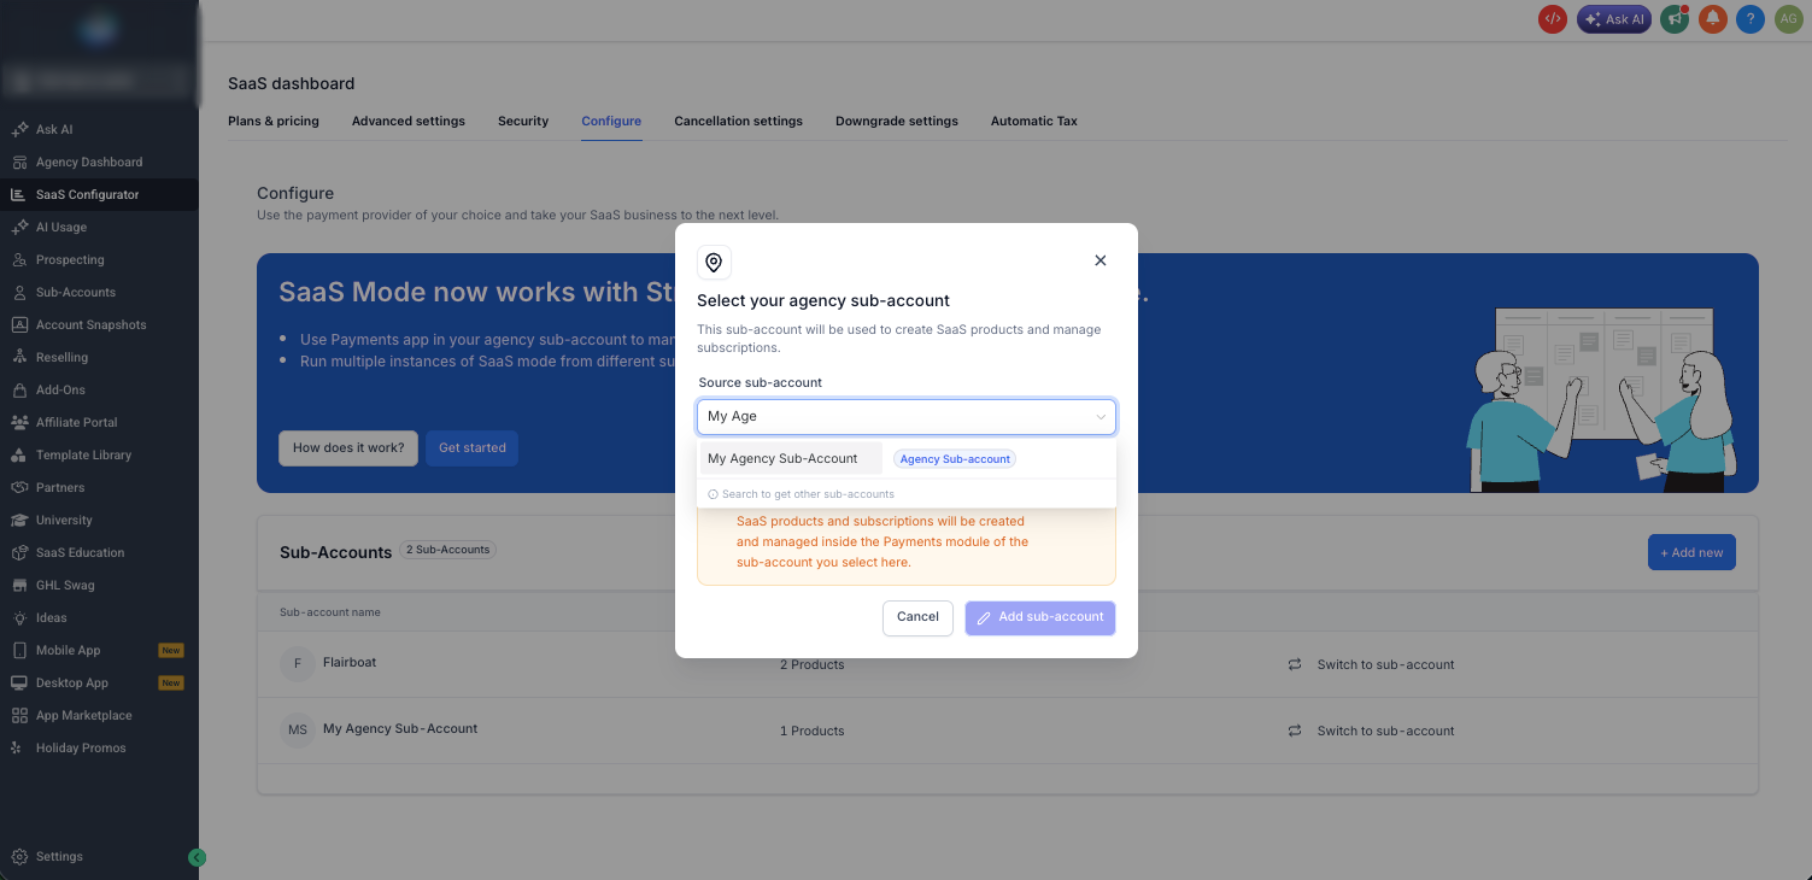
  • For V2: Agency View → SaaS Configurator → Configure → Select Sub-Accounts; then verify that sub-account’s Payments → Integrations.
  • Do not mix: record which architecture owns this test plan and where your team will troubleshoot failed payments.

Agency View → SaaS Configurator → Configure

03 · PLAN FAMILY

Create a category before you add related plans.

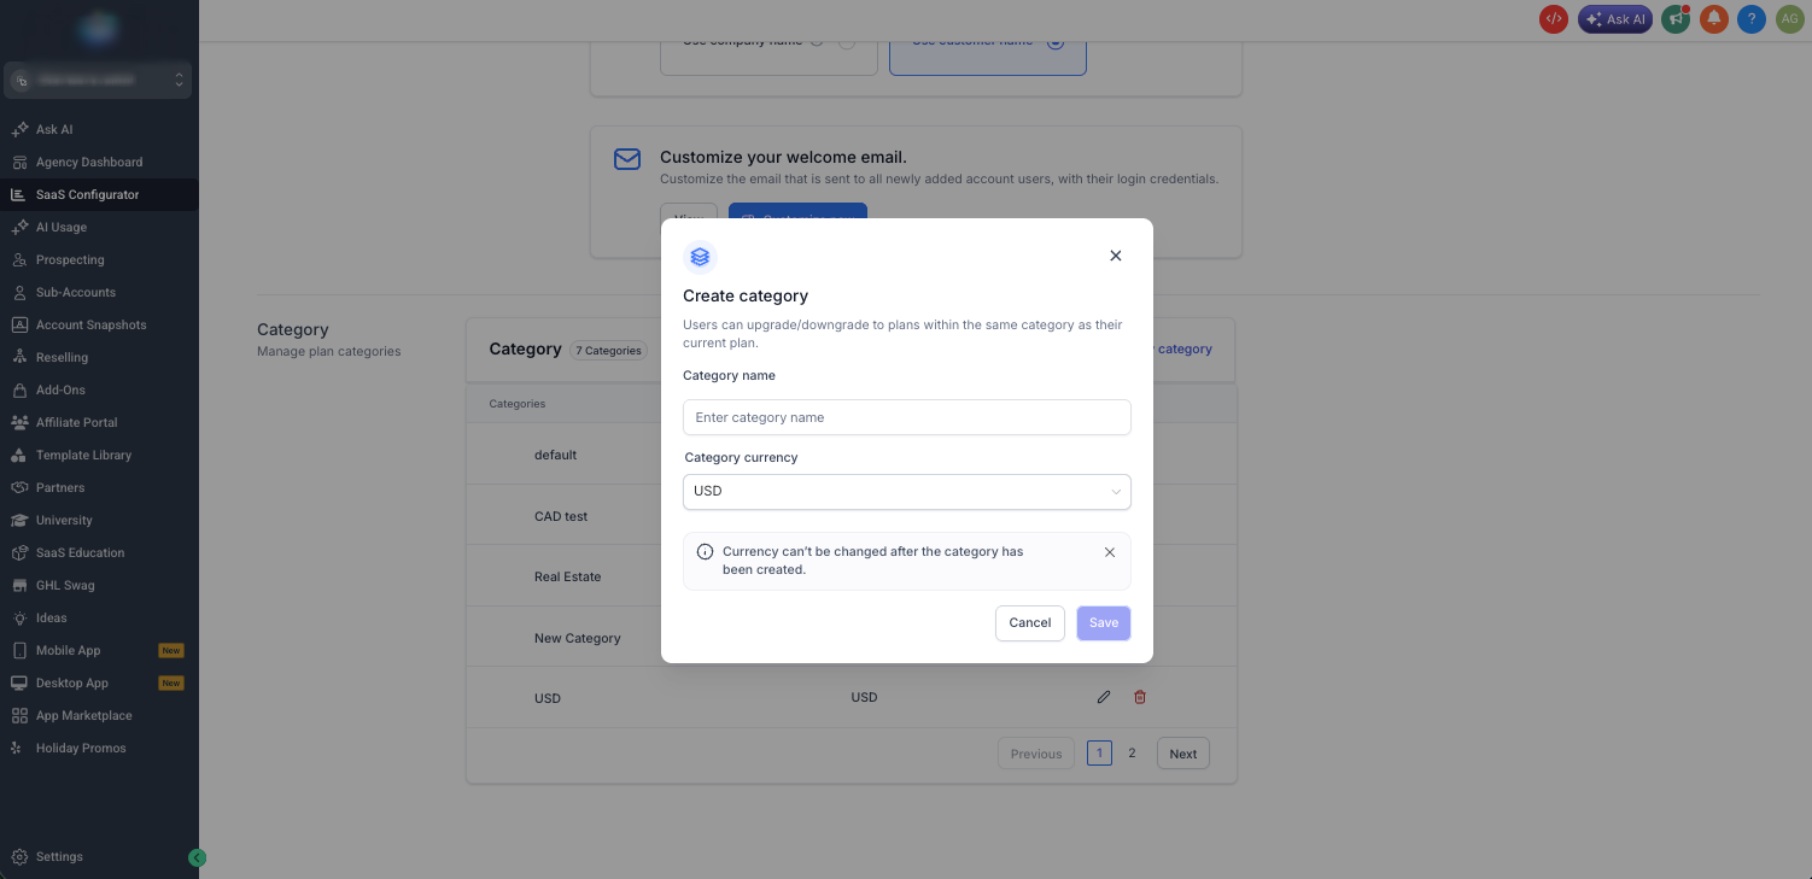
  1. Open Advanced Settings.
  2. Choose Add New Category.
  3. Name it and select the currency.
  4. Put compatible upgrade and downgrade destinations in the same category.

SaaS Configurator → Advanced Settings → Add New Category

Guardrail: category and plan level affect plan-change paths. Set them deliberately before the first customer subscribes.

04 · STANDARD PLAN

Add your plan, then complete each configuration stage in order.

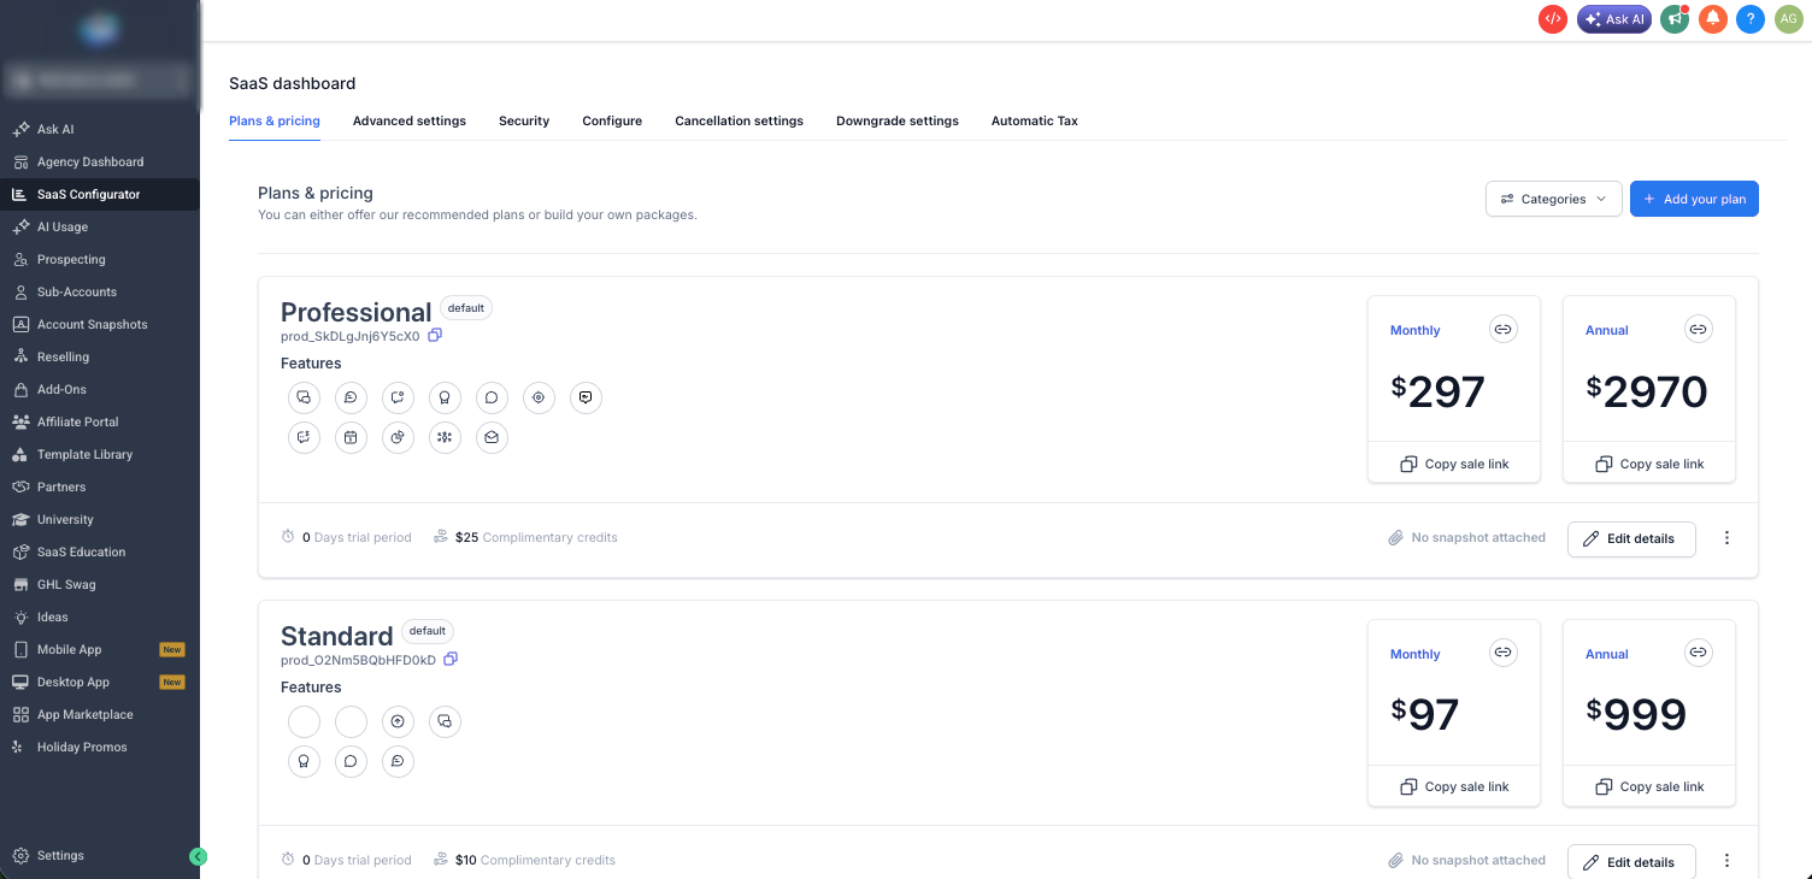
  1. Open Plans & Pricing and select Add your plan.
  2. Choose the provider or architecture, then give the plan a customer-safe name and description.
  3. Set category, monthly and/or annual pricing, and user/contact limits.
  4. Review Features & Snapshot, Add-ons, Marketplace apps, Trial & Credits and Rebilling.
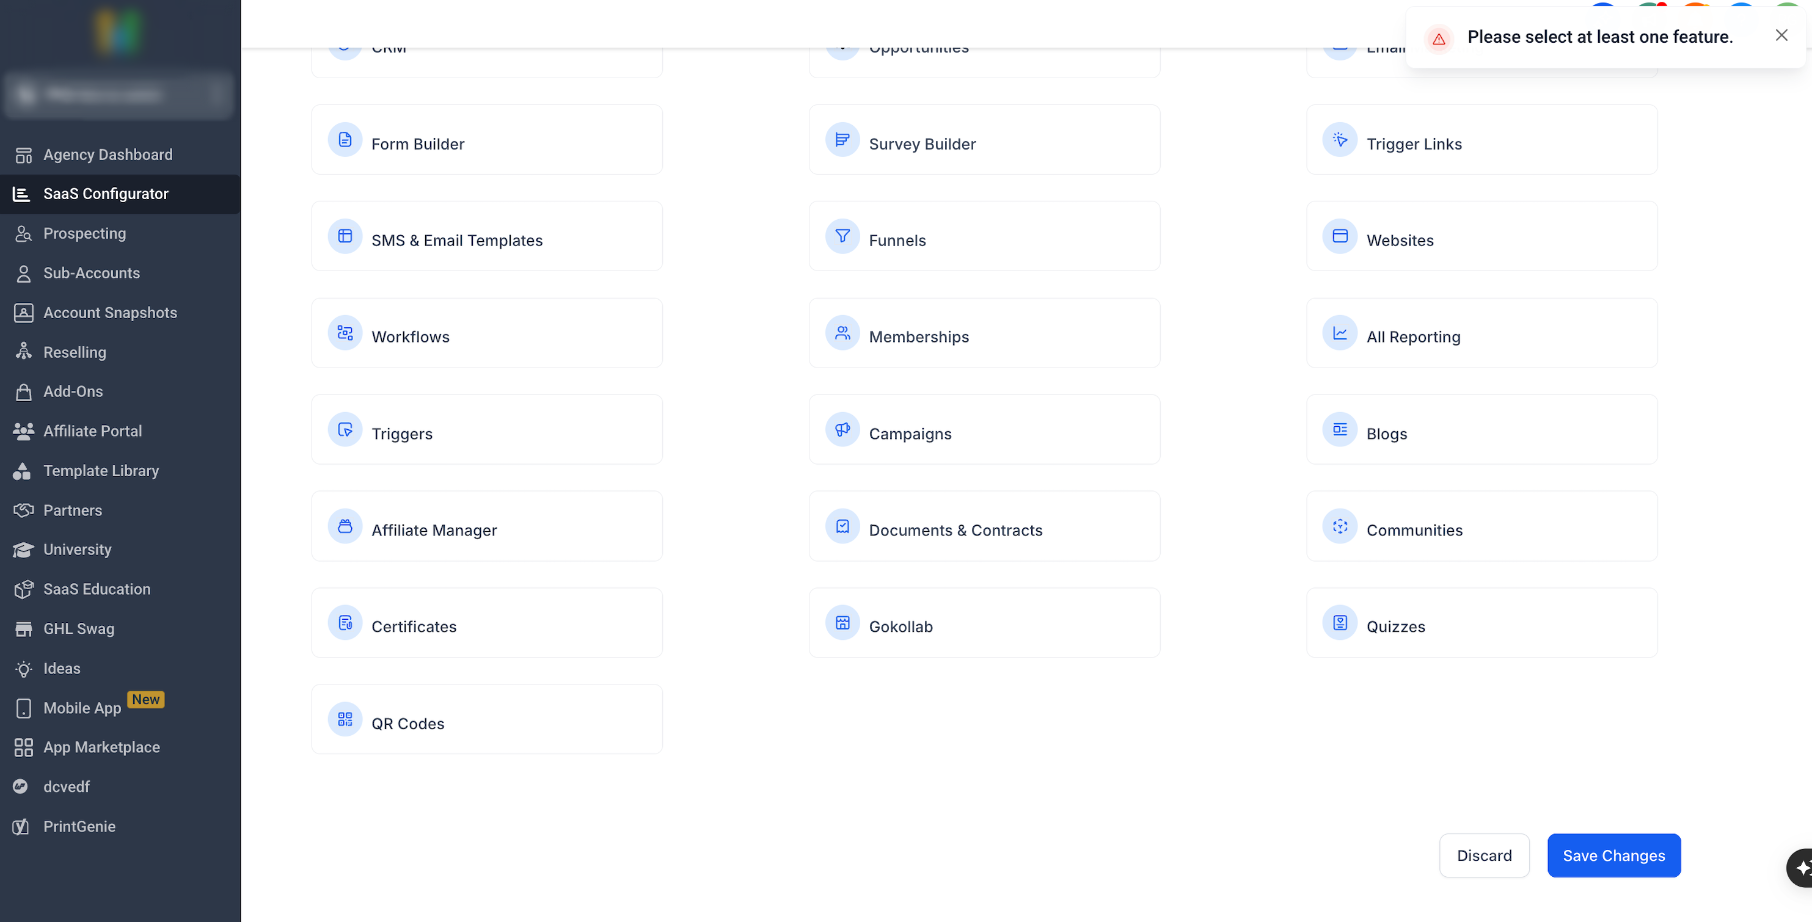
  5. Select at least one product feature—HighLevel will not save a completed SaaS plan without one.

SaaS Configurator → Plans & Pricing → Add your plan

HighLevel SaaS plan feature selection screen
Official HighLevel screen reference: feature selection is a required part of the SaaS plan setup. This is the point to confirm the client-facing access you want Standard customers to receive.

05 · ACCESS AND PROVISIONING

Attach a tested snapshot and turn on only the features you sell.

  • Build the Standard snapshot in a non-client test account first.
  • Include only the workflows, pipelines, forms, calendars and templates every Standard customer should receive.
  • Test the snapshot before attaching it to the paid plan.
  • Remove feature access you intend to reserve for a higher tier.

Agency View → Account Snapshots

What you should see: the plan lets you define product features and optionally attach a snapshot. A saved plan alone is not evidence that client provisioning will work.

06 · TRIAL, CREDITS AND REBILLING

Set the usage promise and the customer price separately.

  • Trial & Credits: choose trial days and one-time or recurring complimentary credit, with optional rollover.
  • Rebilling: review Phone System, Email and each premium usage area you enable.
  • Sales copy: describe shared credit honestly; it is not automatically a fixed independent allowance of emails and SMS.
Write down the policy: when is credit added, what happens when it is spent, and which customer-facing rate or markup applies after it is gone?

07 · SELL THE PLAN

Use a direct sale link first; add a funnel only after the plan works.

  • Fastest test: find the plan in Plans & Pricing and copy its sale link.
  • V1 funnel: import the Stripe product and current price into the selling sub-account before placing it on an order form.
  • V2 funnel: use the selected Agency Sub-Account’s product and funnel tools.

SaaS Configurator → Plans & Pricing → Sale link

08 · LAUNCH QA

Run one controlled customer journey before publishing.

  1. Buy the plan with a controlled test customer and payment method.
  2. Confirm the subscription is active or trialing in the correct system of record.
  3. Confirm the right sub-account exists, the snapshot applies and the user receives the intended feature access.
  4. Test one upgrade or downgrade and one cancellation. Record the rollback path.
Pass condition: checkout, subscription, sub-account, snapshot, access, usage policy and invoice all match the one-sentence offer you wrote at the start.
Screen references

Use these official HighLevel screens to orient yourself.

The labels can change as HighLevel updates the interface, but these are the screens and decisions you should be looking for.

HighLevel SaaS Configurator showing the V1 and V2 architecture options
First decision: identify which SaaS architecture owns the subscription before you create a plan.
HighLevel SaaS V2 agency sub-account selection screen
V2 setup: choose the internal Agency Sub-Account that will hold the billing relationship.
HighLevel SaaS plan category creation screen
Plan family: create categories before related plans so upgrade and downgrade paths remain intentional.

NEXT READ

Need a side-by-side view of usage controls?

Read the evidence-led comparison after you finish this build path. It tests how HighLevel’s shared credit and rebilling model compares with Votel’s service-level usage controls.

Compare HighLevel vs Votel